Every day, Google processes more than 8.5 billion searches. Many of these searches are related to your business.
So, if you want to reach high-quality prospects, Google Ads is probably the best place to start.
However, in order to do that cost-effectively, you need to implement the right strategies.
After all, no matter what industry you are in, you’ve got people to compete with.
In this in-depth Google Ads guide, you’ll learn everything you need to learn to run profitable Google Ads.
Let’s dive in.
What is Google Ads and How Does it Work?
Google Ads is a platform that helps you advertise your products on Google’s network. It works on the pay-per-click advertising model where advertisers are charged a set amount every time someone clicks on their ad.
3 Elements of a Google Ads Campaign
There are three main elements of a Google ad:
Budget
The daily budget you set while creating your Google Ads campaign. For instance, $10/day for 7 days.
Audience
The group of people you target with your Google Ads.
Ad (Offer)
A Google ad includes your copy (written text), image (for Display Ads), and ad extensions. But, the most important element of an ad is your offer. Your offer depends on the pain point or desire of your audience.
Why Use Google Ads?
There are multiple reasons why businesses continue to use Google ads and you should, too.
Cost-Effective
Done right, Google Ads can offer an amazing ROI (return on investment). That’s mainly because you don’t have to pay the ad platform unless someone clicks on your ad, hence the name pay-per-click.
So, it all comes down to how effectively you design and implement your ad campaign.
Pro tip: When it comes to paid advertising, always start small, even if you are confident that your ad will deliver the best ROI. You can always increase your budget later.
High-Quality Leads
Google is a search engine. Most people have something specific in mind when they’re searching on it.
For instance, someone searching for “Best hiking backpacks” is probably looking to buy a hiking backpack.
The minute they land on your ad after searching for your target keyword, they become your lead.
And since they’re already looking for a solution, you won’t have to do much to convince them to take action.
Google Ads throws red-hot leads in your lap. But, of course, you need to optimize your ads for conversions, which we’ll talk about in detail later.
Detailed Targeting
Google Ads can be highly converting thanks to the platform’s powerful detailed targeting feature. It lets you get in front of a group of people that are most likely to become your customers. The targeting options include:
- Age
- Gender
- Location
- Interests
- And, more
Not only that, but Google ads also make it easy for you to retarget your leads.
Tracking & Measuring
Google Ads doesn’t only put your business in front of the right audience, it also helps you track them and ensure maximum conversions. Plus, you always know how your ads are performing and can make necessary tweaks on the go.
What are Keywords and Why are they Essential?
A keyword is a term or phrase that your target customers use to find answers on Google. As an advertiser, you create your Google Ads around these keywords.
Thankfully, finding these keywords is pretty easy; Google’s own Keyword Planner gives you a complete list of them with actionable metrics.
Google Keyword Planner
Google Keyword Planner is a free and reliable tool that gives you the keywords you want to target in your ads.
As soon as you search your main keyword or phrase (or multiple of them), the tool spits out a laundry list of related terms with data.
It also gives you the data you can use to filter out the right keywords for your business, for instance, top-of-page bids.
Structure of Google Ads
Before talking about different types of Google Ads, it’s important that you understand what Google Ads look like from a distance.
Level 1: Ads Account
At the top is the ads account level. When you create your Google Ads account, you are at your ads account level. Any changes on the ads account level are applied to all the levels below it: Campaigns, ad groups, and ads.
Level 2: Campaigns
You can create multiple campaigns under a single Google Ads account. On this level, you select your goal and audience, set your ad schedule, and more. Changes in a campaign are applied to all the levels below it: Ad groups and ads.
Level 3: Ad Groups
You can create multiple ad groups under a single campaign. Each ad group contains a set of keywords that you want to target in your ads. Any changes you make on this level are applied to all the ads under it.
Level 4: Ads
On the last level, we have our ads. An ad group can have multiple ads with varying copy and media (images, videos). But, you can’t change the keywords on this level. They are selected on the ad group level.
Types of Google Ads
Google lets you showcase your business on a variety of online platforms, including its own search engine.
Let’s take a brief look at each ad type.
Search Ads
These are the ads that you see after searching a keyword or phrase in Google, hence the name search ads.
For instance, searching for “Pool chemicals” would return the following results.
Notice that Google shows four ads on the first results page. The higher you are up the line, the better visibility you get.
Your ad’s relevance, bid amount, and overall quality determine where it’s shown on the first page.
Display Ads
Display ads are shown on Google partner websites all over the internet. When you visit a webpage, you might see ads in different locations. These are Google display ads.
Here’s an example of a Google display ad within a blog post.
YouTube Ads
YouTube ads are video ads that you can either showcase within YouTube videos or on the search results page.
An example of this would be a skippable video ad showing right after you click on a YouTube video. We’ll talk about YouTube ads in detail in a bit.
Shopping Ads
Shopping ads show on the first page for search terms that indicate buying intent.
For instance, here’s what Google returns for the term “Shoes”.
Using Google Shopping Ads, you can showcase your products along with information like color, ratings, price, size, and more.
This helps you attract high-quality traffic to your store.
App Ads
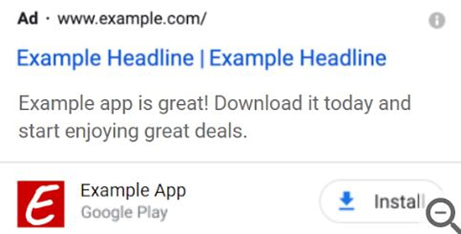
Google App Ads help you promote your Play Store apps on Google search, YouTube, Google Play, and more. You can promote your app to the right people and increase your downloads by using Google App campaigns.
Smart ads (Automated)
Smart ads are an automated tool that helps businesses reach more customers on Google’s Network. The feature takes care of most of the stuff for you, which can be a good thing. However, since we want more control over our Google ads, we won’t be using them.
Local Ads
Local ads, as the name suggests, are meant to reach a local audience, for your physical location. When someone searches for a local term like “Electricians in New York”, they may see nearby businesses with information like hours, contact number, location, and reviews.
Discovery Ads
Discovery ads are targeted at people who might want to discover new products or services. These ads appear in the YouTube app, the Gmail app, and the Google app.
Planning Your Google Ad
Identify Your Goal
One of the first things you’d need to do while creating an ad is to select your campaign goal. Your goal is eventually going to affect your whole campaign.
These include:
- Awareness
- Views
- Traffic to your store
- Lead generation
- More sales
What’s Your Offer
Your offer needs to be in line with what your target audience wants. Only then can you generate the desired results.
Your offer can be anything from an online course to an e-commerce product. The benefits of your product or service are eventually going to make your offer compelling.
Copy
Your Google Ads copy is more important than you might think. A few words can make or break your ad, so choose them wisely.
You want to spend some time and come up with the best headlines, descriptions, and CTA for your ad.
Or, you can always get in touch with a copywriter to do that for you.
Media
Your Google Ads’ media mainly includes images and videos. Not all ads need them though. For instance, Google search ads are all about text.
Whereas, you might need to create eye-catching media for Google Display Ads.
CTA (Call to action)
Last but not least, your CTA is a short piece of text that gets your audience to take some kind of action.
It should be concise, actionable, and clear. Here are a few examples:
- Buy now
- Call now
- Join our newsletter
With all that out of the way, it’s time for some action. In the next few sections, we’ll be diving into the practical stuff. Let’s start with how you can create Google Search Ads the right way.
How to Create Google Search Ads?
Creating the Campaign
After creating your Google Ads account, you’ll see a “+” icon on the left side of your dashboard.
Click on it and create a new campaign.
Now, the first important step is to choose your campaign objective.
The objective should align with your advertising goal. For instance, if you want traffic to a specific web page, select the “Website traffic” objective.
Other Google Ads campaign objectives are:
- Sales
- Leads
- Product and brand consideration
- Brand awareness and reach
- App promotion
- Local store visits and promotions
Moreover, you can even create a campaign from scratch, without getting any guidance from a goal. But, as a beginner, you should stick to a goal.
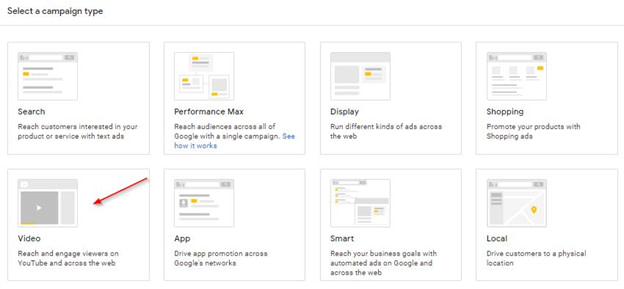
Next, you’ll have to select the campaign type, which will impact your ad type and the locations it’ll be shown in.
For instance, the “Search” ad campaign type is for promoting your business on Google search. The “Video” ad campaign type lets you engage your target audience on YouTube and other web pages.
As we’re focusing on Google Search Ads, we’ll select “Search”.
Next, enter your website’s URL and choose a name for your campaign.
Remember: The website or homepage URL you’ll add here is different from the “Final URL” we’ll talk about later.
This is just to let Google extract keywords from your website.
Moreover, keep in mind that your campaign’s name represents it.
So, name it in such a way that you can recognize it later.
For instance, “Technology enthusiasts, US, 18 – 25”.
The next step is to enter your campaign budget and bidding strategy.
Now, you can set your cost per click bid limit manually, but it’s a better idea to let Google optimize it for maximum results automatically.
And, as we are only focusing on the search network, for now, we’re unchecking the “Display Network” option for this campaign.
Next, you can add the exact location where you want Google to showcase your ad.
Google even lets you exclude a particular location.
Go to “Advanced search” for better control.
You can now type in the exact location and see it on the map.
Choosing the Language
In the next step, you are asked to enter the language of your target customers. It’s “English” by default, so we’ll leave it as is.
The more important part is the start and end dates of your ad.
It’s highly recommended that you run your Google Ads for at least 7 days before analyzing and making any changes.
That’s because some of your target audience might only be active on the weekends and some are more accessible on weekdays.
You want to give Google a week before deciding the fate of your ad.
The next step is optional and should only be used if you want to put a time limit on your ads. For instance, when your target audience is located in a different time zone.
Now, the next step will have a huge impact on your campaign’s success.
You want to take your time, explore different options, and pick the right audience for your ad.
Here, you can select a highly targeted audience for your ad. Google lets you create an audience segment based on factors like:
- Detailed demographics
- Interests and habits
- Search behavior
- Past business interactions
By selecting the right options, you help Google put your ad in front of the people that are most likely to click on it.
Until now, we’ve talked about how to create a Google Search Ad campaign. Let’s move on to the second level: Ads Group.
Setting Up the Ads Group
After you select and save your target audience, you’ll have to create your Ads Group. Remember, the ad group level is where we’ll be selecting our keywords.
So, what we can do is, enter our website address and let Google extract relevant keywords from there.
But, since those keywords aren’t always accurate, you don’t want to go that route.
Instead, what you want to do is get help from the Google Keyword Planner.
Just go to the tools page, enter your primary keyword, and hit “Get results”.
You’ll find it in the “Planning” section under “Tools and Settings”.
Also, after searching a keyword, make sure you select the right location at the top.
That’s something many advertisers tend to forget while extracting keywords for their campaigns.
As you can see, Google Keyword Planner gives you a laundry list of “Keyword ideas” with actionable metrics like “Avg. monthly searches” and “Competition”.
Download the list, pick the most relevant ones, and add them to your Google Ad Group.
Make sure to add no more than 20 keywords to that list.
Creating a Search Ad
The last, and probably the most important part is creating your ad.
The “Final URL” is the web page you want people to land on, so don’t confuse it with your homepage.
The “Display path” is what Google shows when someone views your ad on the search page.
Now, while you create your Google Search Ad, keep an eye on the “Ad Strength Score”. It gives suggestions on how you can improve your ad.
Google wants you to create at least 3 different headlines. It tests different combinations and uses the best-performing one.
You can create multiple ads under a single Ad Group, but keep in mind that the keywords will remain the same.
That’s because you can only change your keywords on the Ad Group level.
Also, make sure you include your target keywords in those headlines.
Similarly, include multiple descriptions to give Google more optimization options.
Once you’ve created your ad, it’s time to create ad extensions. Although they’re not mandatory, an ad extension when makes sense can improve your conversions.
We’ll be talking about different ad extensions and how they can improve your ad’s performance later.
That’s it. You’ve created your Google Search Ad. But, before hitting “Publish”, it’s a good idea to review your campaign.
Once you publish your campaign, Google will review your ad/s. It’ll approve or disapprove within 1 business day.
It could take 2 days in case your ad is more complex. But, you should contact Google support if it takes more than that.
How to Create Google Display Network Ads?
Here’s how Google compares Search Ads and Display Ads:
If you want to promote your business all over the internet, you should consider using Google Display Network Ads.
Display Ads are very widespread and shown on Google partner websites, including giants like CNN.
When your target keywords match with the content of any of these sites, Google displays your ad.
How to Create Professional Images for Display Ads?
Google Display ads are visually engaging ads, which makes images an important part of them.
But, how can you create professional images for a Display ad when you don’t have any experience?
Thanks to Canva free, anyone with basic design knowledge can create eye-catching ad images.
But, where do you start from?
Well, Canva does offer pre-built templates that you can take inspiration from.
However, the “Resize” option comes with the paid version. So, when you’re on the free version, you’ll need to create every design separately.
So, after logging into Canva, just click on “Create a design”, select “Custom size”, and enter your dimensions.
You can get Google to showcase your ad in all shapes and forms.
For instance, the 300×50 pixel dimensions are for a banner ad.
Or, if you want to create a square ad, set the custom dimensions to 200×200 pixels.
The nice thing is that you’ll find templates for all of those sizes.
You can then edit the design according to your liking.
Let’s take another example. Let’s say you also want to upload a square ad.
Enter 200×200 pixels as your custom size and hit “Create a new design”.
You’ll get a lot of templates to play around with.
So, choose the one you like and customize it to your heart’s content.
Another great option is “Responsive Display Ad”.
You upload different assets (images, text, logos, headlines, and descriptions) and Google will automatically optimize them for the best results.
Create a Display Ad Campaign
Create a campaign by clicking on the “+” icon, like the last time.
Chose your goal. “Traffic” is the most popular one, so let’s go with that.
Under the campaign type, choose “Display”.
Next, Google will ask you to choose between “Standard Display Campaign” and “Smart Display Campaign”.
The first one is recommended as you want more control over your ad.
Then, you’ll be entering your website URL and create a campaign name.
Remember: Create a name that’s easy to remember and recall. For instance, “Parents of toddlers in the US”.
In the next step, you’ll be choosing your target location. Go to the “Advanced search” option and enter your location to see it on the map.
You can even add multiple locations.
Setting Your Bidding Strategy
Then, enter your budget and set a bidding strategy.
It’s recommended that you keep the bidding strategy to “Automatically maximize conversions”.
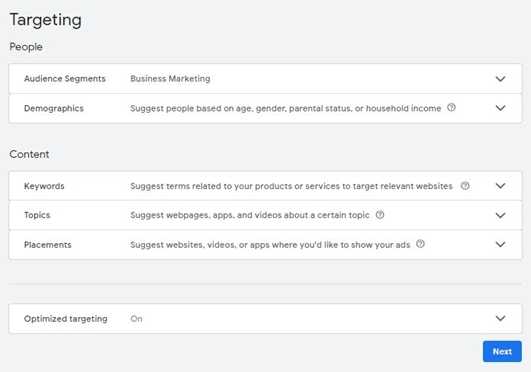
Don’t forget to select your target audience.
Google Display Ads lets you choose the:
- Audience segments
- Demographics
- Keywords
- Topics
- Placements
With the “Optimized targeting” option turned on, Google will help you get more conversions by reaching people beyond your set parameters.
Remember: Your audience shouldn’t be too broad. You want to narrow it down. For instance, if you want to present your ad to everyone from 18 to 65+ age, create multiple campaigns.
It’s time to start creating your Google Display Ad.
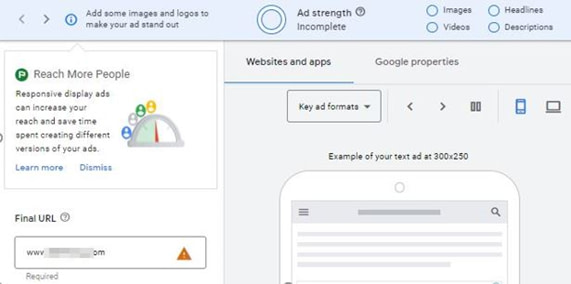
The good thing is that your Display ad also gets an “Ad Strength” score with optimization suggestions.
So, you can keep on improving your ad until Google thinks it’s ready to publish.
Moreover, the real-time preview of your ad tells you how it’ll look on a website.
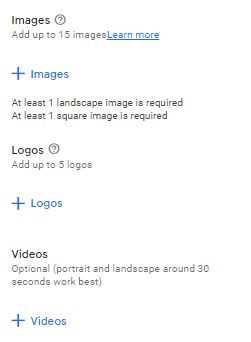
While creating a Display Ad, you’ll need to upload multiple assets (Images, logos, descriptions).
At least two images are a must (1 landscape and 1 square).
Adding multiple assets will help Google test different variations and use the best-performing ones.
After creating your Display ad, just review the campaign to make sure everything is correct and hit “Publish”.
Again, Google will take 1 – 2 business days to approve/disapprove your ad.
As soon as your ad gets approved, keep tracking it in your account under campaigns.
With Google Display Ads out of the way, let’s focus our attention on the third biggest ad type: YouTube Ads.
How to Create a YouTube Ad?
In the next few sections, you’ll learn everything you need to learn in order to run successful YouTube ads.
What are YouTube Ads?
YouTube ads are video ads that are run through the Google ads platform. The goal is to market a brand or product on YouTube and reach more customers.
Here’s what Google says about YouTube ad format types:
Pro tip: If your ad is longer than 3 minutes, use it as an in-feed video ad.
Why Use YouTube Ads?
Videos in general are growing in popularity by the day. People love to consume videos because they tend to be more engaging and fun.
YouTube alone is projected to reach over 2.8 billion active users by 2025.
So, as a marketer, you can’t afford to ignore video advertising.
Creating a YouTube Ad
What’s Your Goal?
Before you dive into the video ad creation process, it’s important that you clarify your goal.
For instance, is it just more views or do you want to engage prospects?
Maybe you just want people to visit a particular web page on your site?
Capture Attention in 5 Seconds
Statistics suggest the average human attention span has shrunk to 8 seconds. As a marketer, you need to craft video ads that can grab people’s attention and keep them hooked.
Get them to Click
Unless you just want your prospects to view your video ad, you need to make them act.
The target location could be anything from a landing page that captures leads or a product page that’s meant to generate sales.
More YouTube Ads Tips
- Talk Directly to the Viewer
- Start With a Question
- Keep it Simple
How to Create Videos for YouTube Ads?
Now, this part could be a little overwhelming if you’ve never created a video ad before.
But, know that it’s pretty simple.
Here’s what you’d need.
Camera
A good camera shouldn’t have to be expensive; your smartphone camera can be enough if you don’t have the budget for a professional one.
Microphone
You want your voice to be crystal clear in a video ad, and for that, you need a high-quality microphone.
Lighting
Sun is the best source of light for video ads in most cases. But, if you can afford an LED panel, that’d be great, too.
Now, if you’re not comfortable recording yourself for a video ad, there’s good news.
You can use online software to create your video ads.
Here are a few recommendations:
- InVideo.io
- Animoto
- Canva
Or, you can outsource your video ad creation to a freelancer or an agency.
How to Create a Video Ad Campaign?
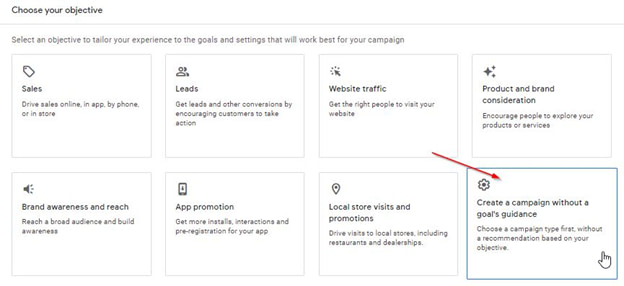
First, you want to create a new campaign by clicking the “+” icon, as we did on previous campaigns.
Then, you want to choose the “Create a campaign without a goal’s guidance”. We’ll have more control that way.
In the next step, you’d be asked to select your campaign type. So, click on the “Video” campaign type.
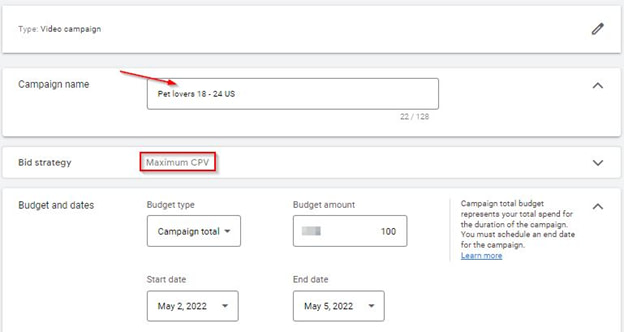
Next, you want to give a name to your campaign. Keep it memorable and relevant.
Leave the bid strategy at maximum CPV (cost per view).
CPV is the amount you pay Google for every YouTube video view, depending on other advertisers’ bids.
Since you probably don’t know your exact CPV, it’s better to leave it to the algorithm.
Next, enter your video ad budget and set the start and end date.
Remember, you want to run your ad for at least 7 days. Only then you’ll be able to tell if it’s working or not.
Moving on, YouTube then asks you to select the networks you want to show your ad on.
Now, you only want Google to show your ad on YouTube, so select the first two options.
That’s because you don’t know where your ad is going to show if you check-mark the third option, too.
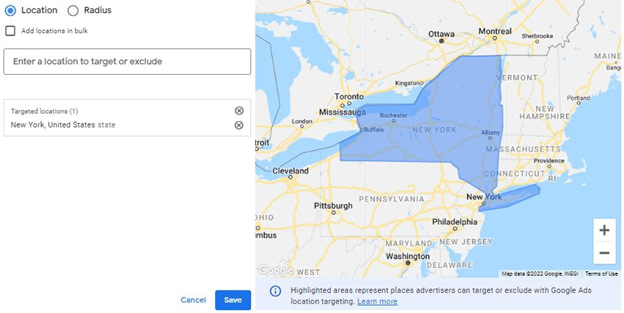
You’ll then select the location of your target audience. Use the “Advanced search” option to narrow down your location.
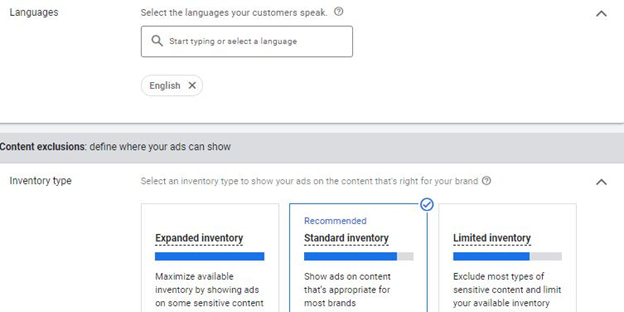
Next, set the language of your ad as English, unless you want to target a specific demographic.
As for the inventory type, keep the second option selected as it’s the recommended one.
Choosing the Demographics
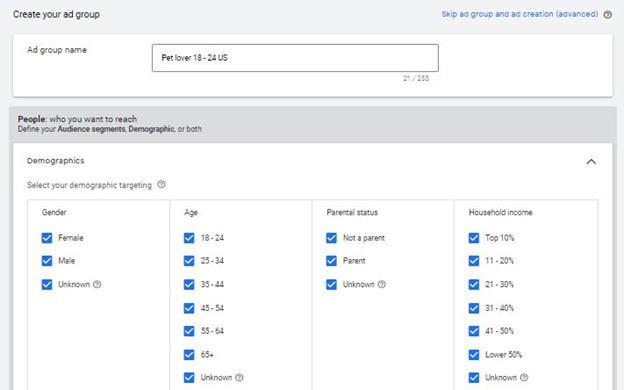
When you’ll scroll down, you’ll see an option to choose the demographics of your target audience.
Remember, even if you think your audience includes everyone under the sun, it’s not a good idea to select all ranges under a single ad group.
In that case, you can create multiple campaigns with varying demographics. This way, you’ll also be able to split-test your audience for better results.
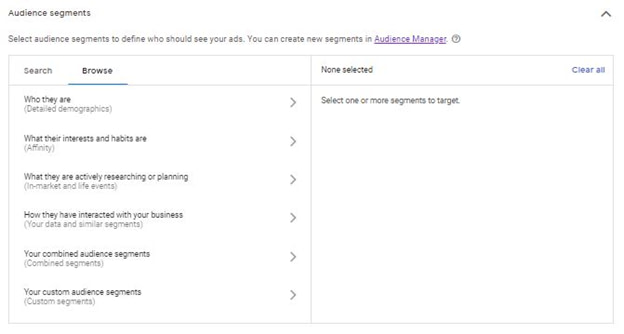
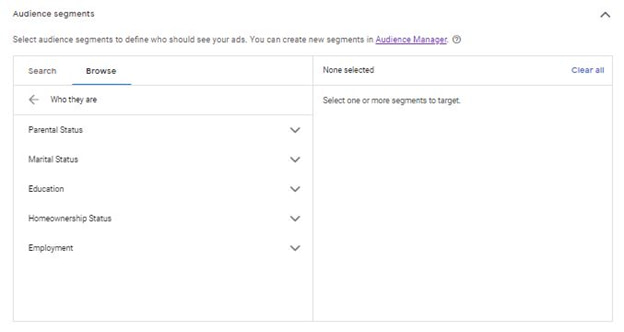
Next, spend some time on the audience segmentation part. Browse different interests, hobbies, demographics, and activities to filter out a highly targeted audience.
For instance, under the demographics option, you can narrow down your audience on the basis of their education, employment, marital status, and more.
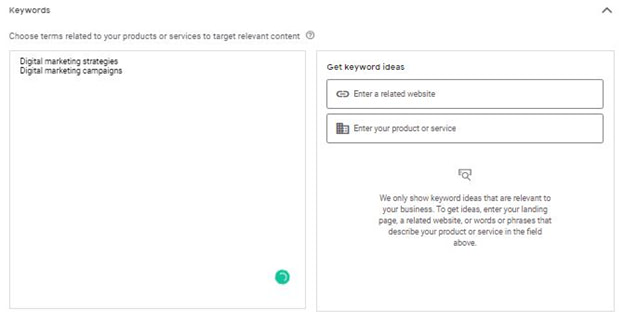
Now, you’ll be able to enter your target keywords. They should be no more than 20. Use Google Keyword Planner to find the right keywords for your video ad.
As you can see in the above screenshot, you can even get keyword ideas from a related website, too.
You can use this option to extract your competitor’s keywords.
Plus, entering your product name will also get you a few relevant keywords you can use in your ad.
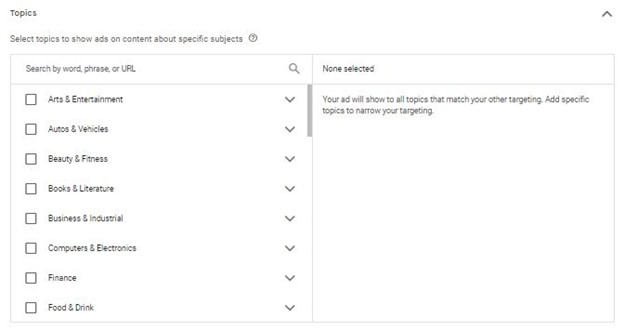
Then, you can select relevant topics. This would be the type of content you want to show your ads on.
For instance, if your ad is about digital marketing, it’d run on videos related to digital marketing.
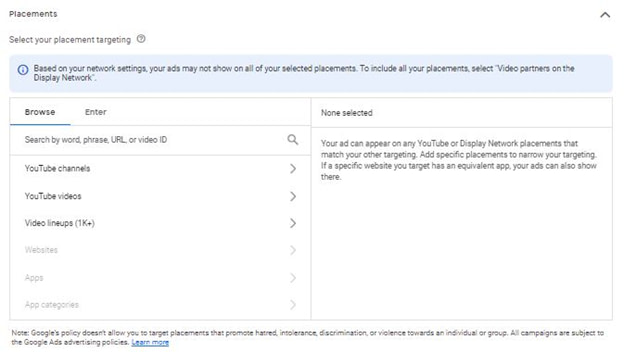
The next part is placements.
The incredible thing is that you can even show your ad on a specific video or channel.
Let’s say there’s a video that gets a lot of views regularly in your category. You’d naturally want to show your ad on that video, right?
All you’d have to do is paste that video’s link.
Let’s move on to the ad creation part.
Creating a YouTube Video Ad
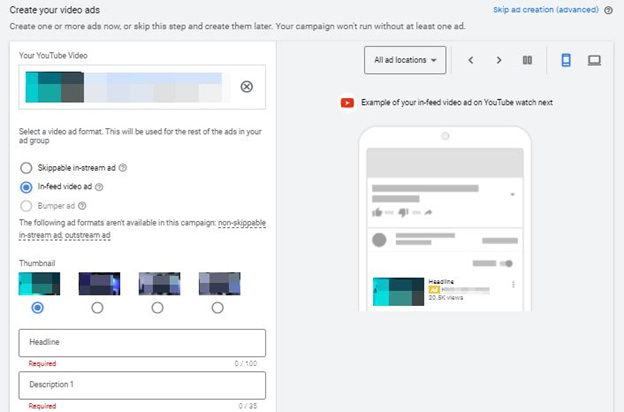
Note: You need to upload your video ad to YouTube as a public video.
Assuming that you’ve already done that, all you have to do now is copy and paste that video’s link.
Now, if your video is longer than 3 minutes, it would make a perfect in-feed ad.
An in-feed ad is placed around other YouTube content, so anyone clicking on it is likely interested to watch your video.
After you’ve set the placement of your video ad, it’s time to write some catchy headlines and descriptions.
Don’t forget to include your most important keywords there.
Lastly, you need to set the maximum CPV bid.
But, to do it right, go to Google Keyword Planner and check the “Top of page bid” of your target keywords.
Although that’s meant for search ads, it can give you a good idea about your video’s CPV.
Put that amount in your CPV bid.
If you’re not sure about your CPV, the “Top content bid adjustment” option will come in handy.
It will keep your bid flexible. So, let’s say you set a bid of $1 and a 20% “Top content bid adjustment”.
Google will adjust your CPV bid by $0.2 (20% of $1).
Next, just publish your campaign by clicking on “Create campaign”.
Your video ad campaign will be published. Keep monitoring your campaign to identify weak areas and opportunities and make tweaks to it accordingly.
Optimizing Your Google Ads with Ad Extensions
Google Ad Extensions can help you convert more people with your search ad.
The good thing is that you get to do that for free.
A major reason why Google ad extensions are so effective is that they get your ad more SERP real estate.
And that tends to improve the click-through rate.
Here is a quick walk-through of the types of extensions you can use with your Google Ads:
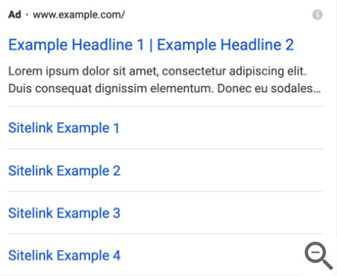
Sitelink Extensions
Sitelink extensions let you link specific pages of your site in your ad. Implemented right, they can help you improve your ad’s click-through rate.
Image Sitelinks
Using image Sitelinks, you can include an image with a link to your site. This type of extension is ideal for showcasing your product image on the search page.
Callout Extensions
Advertisers use callout extensions to highlight specific information about their products or services. You can use up to 4 callout extensions on a single ad.
Structured Snippets
Structured Snippets help you highlight specific aspects of whatever you are selling. They help you get more clicks on your ad.
Lead Form Extensions
Lead form extensions help you collect information about your prospects through a lead form.
They make it easy for people to share information with you by showing a lead form directly in your ad.
Call Extensions
Call extensions let you showcase your contact number in your ad. With a call extension, anyone viewing your ad can call your business directly.
Price Extensions
Price extensions let you showcase your product prices. So, before users can click on your ad, they’d know what to expect from your store, helping you attract only high-quality leads.
Promotion Extension
Whenever you want to promote special offers or highlight a sale, you can use the Promotion Extension.
Location Extensions
Using Location Extensions, you can promote your business’s physical location to nearby prospects.
App Extensions
With an app extension, you can make it easy for your prospects to download your app directly from your ad.
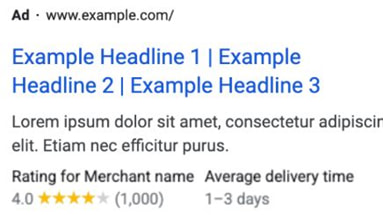
Seller Ratings
Seller Ratings are a perfect way to build trust with your target audience if your product has multiple positive online reviews.
Know that you can apply a Google Ad Extension on one of three levels:
- Account level
- Campaign level
- Ad group level
If you apply for an extension on the account level, the changes will be applied to all the sub-levels:
- Campaign level
- Ad group level
And, so on.
This was all about how to create Google ads the right way. Let’s answer a few frequently asked questions about Google Ads.
Google Ads – Frequently Asked Questions
What is Search Engine Advertising?
Search engine advertising or SEA is a part of search engine marketing (SEM) where you advertise your products on platforms like Google. Google Ads is the most popular SEA platform that operates on the PPC (pay-per-click) advertising model. Advertisers pay for every click on their ad, hence the name pay-per-click.
How Can Google Ads Help?
Google Ads can help you reach your target audience online. The good thing about the PPC advertising platform is that it lets you achieve your marketing goals cost-effectively. That’s mainly because you only get charged a set amount when someone clicks on your ad. So, your ad’s success largely depends on how effective your strategy is.
Google Ads can help you:
- Build brand awareness
- Generate leads
- Increase site traffic
- Boost e-commerce sales
- Receive more calls
- Attract more foot traffic
- And, more
Do Google Ads Work for Small Businesses?
Yes, Google Ads work for small businesses. It’s a highly effective way to reach your target audience online and achieve your marketing goals cost-effectively, irrespective of the size of your business.
How Long Does Google Ads Take to Work?
After you publish an ad, Google takes 24 – 48 hours to review and approve it. So, you’ll have to wait at least a couple of days before expecting any results. How long it takes to work depends on several factors including your ad objective, keywords, and ad copy. But, done right, Google Ads can bring you results almost instantly.
What is Google Ads Keyword Planner?
Google Ads Keyword Planner is a free keyword research tool advertisers use to find profitable keywords for their Google Ads. All you have to do is enter a seed term or a domain and the tool will spit out a laundry list of related keywords. It also tells you the monthly search volume and top-of-page bid for each of those keywords.
What is Google Shopping Ads?
Google Shopping ads are shown on the first page of Google for search terms that indicate purchase intent. They contain information like product price, color, size, and more. Do Google Shopping ads work? Yes, they’re an incredibly effective way of selling e-commerce products.
What Criteria are Reviewed by Google Ads?
Google reviews your ad’s headlines, descriptions, keywords, destination link, and media before approving it. It takes 1 – 2 days for Google to approve/disapprove your ad. Once it’s approved, you’ll see the “Eligible” status in front of it.
What are Google Search Ads?
Google Search Ads appear above organic search results on the first page of Google. The maximum number of search ads that Google shows for a particular keyword is four. Keep in mind that advertisers don’t get charged when someone views their ad; they only get charged a set amount (depending on the CPC) when their ads get a click.
Where Do Google Ads Appear?
Google Ads appear in a variety of places, including at the top of the search results, Google partner websites, YouTube, Gmail, and more. As an advertiser, you can select the platforms where you want Google to showcase your ads. For instance, when you choose Display ads, you are essentially telling Google to put your ad on websites.
What are Discovery Ads?
Google Discovery ads are geared toward users that are ready to discover a new service or product. These ads are shown in places like the Android Google app, mobile Google.com, Gmail, and mobile YouTube feed.
What are Responsive Search Ads?
A responsive search ad automatically adjusts your ad copy to achieve better results over time. While creating responsive search ads, you need to provide Google with multiple headlines and descriptions. Google will try to land on the best combination after testing them.
What are Responsive Display Ads?
Similar to a responsive search ad, a responsive display ad takes multiple ad assets and tests them to land on the best-performing combination. The only difference is that you’ll need to upload your ad image or video for the display ad.
How to Stop Google Ads Campaign?
To stop a Google Ads Campaign, all you have to do is:
- Go to your Google Ads Campaigns’ page
- Click the status icon of the campaign you want to stop
- Choose pause or remove
How to Run Google Ads for Clients?
Running Google Ads for clients is no different than running Google Ads for your own business. You just have to get access to your client’s Google Ads account and keep reporting the progress on a regular basis or as decided by the contract.
What are Impressions on Google Ads?
Impressions on Google Ads is the number of times an ad is served to people on the first search results page or other websites. So, every time someone views a Google Ad, an impression is counted. But, thankfully, Google Ads operates on the PPC model, which means you don’t get charged until someone clicks on your ad.
Are Google Ads Free?
Yes, it’s free to create an account on Google Ads. Creating a Google Ad is also free. But, of course, whenever a customer clicks on your ad, you’ll be charged a set amount, depending on the CPC of your target keyword.
What are Negative Keywords in Google Ads?
Remember that your ad typically gets triggered against searches closely related to your target keyword. Advertisers add negative keywords to prevent Google from showing their ads for particular words or phrases.
What are Conversions in Google Ads?
A conversion event is anything that you think is significant enough for your business. This could be a click on your search ad, a YouTube ad view, or even a purchasing event on your site. You can define and track conversion events in your Google Ads account.
What is Google Admob All About?
Google Admob is an advertising platform using which app owners can monetize their apps by running in-app ads. It works like Google AdSense but instead of websites, you’re running ads on mobile apps.
Over to You
If you’ve read this far, you already know a lot more than the majority of digital marketers. We’ve talked about everything you need to know to run Google Ads profitably, either for your own business or for clients.
However, keep in mind that knowledge alone isn’t going to help your business grow. You need to implement the strategies to fully leverage this powerful advertising platform.
Also, keep in mind that you won’t create a perfect ad on your first try. Even the most experienced advertisers learn from their mistakes, and you should, too. So, keep making tweaks until you achieve your advertising goals.


